SL-1
Coordinates: 43°31′06″N 112°49′25″W / 43.518233°N 112.823727°W


The SL-1, or Stationary Low-Power Reactor Number One, was a United States Army experimental nuclear power reactor which underwent a steam explosion and meltdown on January 3, 1961, killing its three operators. The direct cause was the improper withdrawal of the central control rod, responsible for absorbing neutrons in the reactor core. The event is the only reactor incident in the United States which resulted in immediate fatalities.[1] The incident released about 80 curies (3.0 TBq) of iodine-131,[2] which was not considered significant due to its location in the remote high desert of eastern Idaho. About 1,100 curies (41 TBq) of fission products were released into the atmosphere.[3]
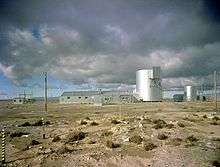
The facility, located at the National Reactor Testing Station (NRTS) approximately 40 miles (64 km) west of Idaho Falls, was part of the Army Nuclear Power Program and was known as the Argonne Low Power Reactor (ALPR) during its design and build phase. It was intended to provide electrical power and heat for small, remote military facilities, such as radar sites near the Arctic Circle, and those in the DEW Line.[4] The design power was 3 MW (thermal), but some 4.7 MW tests were performed in the months prior to the accident. Operating power was 200 kW electrical and 400 kW thermal for space heating.
During the incident the core power level reached nearly 20 GW in just four milliseconds, precipitating the steam explosion.[5][6][7][8]
Design
From 1954 to 1955, the U.S. Army evaluated their need for nuclear reactor plants that would be operable in remote regions of the Arctic. The reactors were to replace diesel generators and boilers that provided electricity and space heating for the Army's radar stations. The Army Reactors Branch formed the guidelines for the project and contracted with Argonne National Laboratory to design, build, and test a prototype reactor plant to be called the Argonne Low Power Reactor (ALPR).
Some of the more important criteria included:
- All components able to be transported by air
- Use of standard components
- Minimal on-site construction
- Simplicity and reliability
- 3-year fuel operating lifetime per core loading
The prototype was constructed at the NRTS site from July 1957 to July 1958. It was operational on October 24, 1958. The 3 MW (thermal) boiling water reactor (BWR) used 93.20% highly enriched uranium fuel. It operated with natural circulation, using light water as a coolant (vs. heavy water) and moderator. ANL used its experience from the BORAX experiments to design the BWR. The circulating water system operated at 300 pounds per square inch (2,100 kPa) flowing through fuel plates of uranium-aluminum alloy. The plant was turned over to the U.S. Army in December 1958 after extensive testing, with Combustion Engineering acting as the lead contractor beginning in February 1959. Members of the U.S. Army, called cadre, began training as plant operators, although some Navy personnel also trained with them.
The majority of the plant equipment was located in a cylindrical steel reactor building 38.5 feet (11.7 m) in diameter and an overall height of 48 feet (15 m). The reactor building known as ARA-602 was made of plate steel, most of which had a thickness of 1/4 inch (6 mm). Access to the building was provided by an ordinary door through an enclosed exterior stairwell from ARA-603, the Support Facilities Building. An emergency exit door was also included, with an exterior stairwell going to the ground level. The reactor building was not a pressure-type containment shell as would have been used for reactors located in populated areas. Nevertheless, the building was able to contain most of the radioactive particles released by the eventual explosion.
The reactor core structure was built for a capacity of 59 fuel assemblies, one source assembly, and 9 control rods. The core in use, however, had 40 fuel elements and was controlled by 5 cruciform rods. The 5 active rods were in the shape of a plus symbol (+) in cross section: 1 in the center (Rod Number 9), and 4 on the periphery of the active core (Rods 1, 3, 5, and 7). The control rods were made of 60 mils (1.5 mm) thick cadmium, clad with 80 mils (2.0 mm) of aluminum. They had an overall span of 14 inches (36 cm) and an effective length of 32 inches (81 cm). The 40 fuel assemblies were composed of 9 fuel plates each. The plates were 120 mils (3.0 mm) thick consisting of 50 mils (1.3 mm) of uranium-aluminium alloy "meat" covered by 35 mils (0.89 mm) of X-8001 aluminum cladding. The meat was 25.8 inches (66 cm) long and 3.5 inches (8.9 cm) wide. The water gap between fuel plates was 310 mils (7.9 mm). The initial loading of the 40 assembly core was highly enriched with 93.2% uranium-235 and contained 31 pounds (14 kg) of U-235.
The deliberate choice of a smaller fuel loading made the region near the center more active than it would have been with 59 fuel assemblies. The four outer control rods weren't even used in the smaller core. In the operating SL-1 core, Rods Number 2, 4, 6, and 8 were dummy rods, had cadmium shims, or were filled with test sensors, and were shaped like the capital letter T. The effort to minimize the size of the core gave the central rod an abnormally large reactivity worth.
Incident and response
On December 21, 1960, the reactor was shut down for maintenance, calibration of the instruments, installation of auxiliary instruments, and installation of 44 flux wires to monitor the neutron flux levels in the reactor core. The wires were made of aluminum, and contained slugs of aluminum–cobalt alloy.
On January 3, 1961, the reactor was being prepared for restart after a shutdown of eleven days over the holidays. Maintenance procedures required that the main central control rod be manually withdrawn a few inches to reconnect it to its drive mechanism. At 9:01 p.m., this rod was suddenly withdrawn too far, causing SL-1 to go prompt critical instantly. In four milliseconds, the heat generated by the resulting enormous power surge caused water surrounding the core to begin to explosively vaporize. The water vapor caused a pressure wave to strike the top of the reactor vessel, causing water and steam to spray from the top of the vessel. This extreme form of water hammer propelled control rods, shield plugs, and the entire reactor vessel upwards. A later investigation concluded that the 12,000-kilogram (26,000 lb) vessel had jumped 2.77 metres (9.1 ft) and the upper control rod drive mechanisms had struck the ceiling of the reactor building prior to settling back into its original location.[6][9] The spray of water and steam knocked two operators onto the floor, killing one and severely injuring another. One of the shield plugs on top of the reactor vessel impaled the third man through his groin and exited his shoulder, pinning him to the ceiling.[6] The victims were Army Specialists John A. Byrnes (age 27) and Richard Leroy McKinley (age 22), and Navy Seabee Construction Electrician First Class (CE1) Richard C. Legg (age 26).[10][11][12] It was later established that Byrnes (the reactor operator) had lifted the rod and caused the excursion, Legg (the shift supervisor) was standing on top of the reactor vessel and was impaled and pinned to the ceiling, and McKinley, the trainee who stood nearby, was later found alive by rescuers.[6] All three men succumbed to injuries from physical trauma;[6] however, the radiation from the nuclear excursion would have given the men no chance of survival even if they had not been killed by the explosion stemming from the criticality accident.
Reactor principles and events
Several "kinetic" factors affect the rate at which the power (heat) produced in a nuclear reactor responds to changes in the position of a control rod. Other features of the design govern how rapidly heat is transferred from the reactor fuel to the coolant.
The nuclear chain reaction has a positive feedback component whenever a critical mass is created; specifically, excess neutrons are produced for every fission. Inside a nuclear reactor, these excess neutrons must be controlled as long as a critical mass exists. The most significant and effective control mechanism is the use of control rods to absorb the excess neutrons. Other controls include the size and shape of the reactor and the presence of neutron reflectors in and around a core. Changing the amount of absorption or reflection of neutrons will affect neutron flux, and therefore, the power of the reactor.
One kinetics factor is the tendency of most light-water-moderated reactor (LWR) designs to have negative moderator temperature and "void" coefficients of reactivity. (Due to the low density of steam, pockets of water vapor are known as "voids" in a LWR.) A negative reactivity coefficient means that as the water moderator heats up, molecules move farther apart (water expands and eventually boils) and neutrons are less likely to be slowed by collisions to energies favorable for inducing fission in the fuel. Because of these negative feedback mechanisms, most LWRs will naturally tend to decrease their rate of fissioning in response to additional heat produced within the reactor core. If enough heat is produced that water boils inside the core, fissions in that vicinity will drastically decrease.
However, when power output from the nuclear reaction increases rapidly, it may take longer for the water to heat up and boil than it does for the voids to cause the nuclear reactions to decrease. In such an event, reactor power can grow rapidly without any negative feedback from the expansion or boiling of the water, even if it is in a channel just 1 cm away. Dramatic heating will occur to the nuclear fuel, leading to melting and vaporization of the metals within the core. Rapid expansion, increases in pressure, and failure of core components may lead to the destruction of the nuclear reactor, as was the case with SL-1. As the energy of expansion and heat travel from the nuclear fuel to the water and the vessel, it becomes likely that the nuclear reaction will shut down, either from the lack of sufficient moderator or from the fuel expanding beyond the realm of a critical mass. In the post-accident analysis of SL-1, scientists determined that the two shutdown mechanisms were almost equally matched (see below).
Another relevant kinetics factor is the contribution of what are called delayed neutrons to the chain reaction in the core. Most neutrons (the prompt neutrons) are produced nearly instantaneously via fission. But a few — approximately 0.7 percent in a U-235-fueled reactor operating at steady-state — are produced through the relatively slow radioactive decay of certain fission products. (These fission products are trapped inside the fuel plates in close proximity to the uranium-235 fuel.) Delayed production of a fraction of the neutrons is what enables reactor power changes to be controllable on a time scale that is amenable to humans and machinery.[13]
In the case of an ejected control assembly, it is possible for the reactor to become critical on the prompt neutrons alone (i.e. prompt critical). When the reactor is prompt critical, the time to double the power is on the order of 10 microseconds. The duration necessary for temperature to follow the power level depends on the design of the reactor core. Typically, the coolant temperature lags behind the power by 3 to 5 seconds in a conventional LWR. In the SL-1 design, it was about 6 milliseconds before steam formation started.
SL-1 was constructed with a main central control rod that was capable of producing a very large excess reactivity if it were completely removed. The extra rod worth was in part due to the decision to load only 40 of the 59 fuel assemblies with nuclear fuel, thus making the prototype reactor core more active in the center. In normal operation control rods are withdrawn only enough to cause sufficient reactivity for a sustained nuclear reaction and power generation. In this accident, however, the reactivity addition was sufficient to take the reactor prompt critical within a time estimated at 3.6 milliseconds. That was too fast for the heat from the fuel to get through the aluminum cladding and boil enough water to fully stop the power growth in all parts of the core via negative moderator temperature and void feedback.
Post-accident analysis concluded that the final control method (i.e., dissipation of the prompt critical state) occurred by means of catastrophic core disassembly: destructive melting, vaporization, and consequent conventional explosive expansion of the parts of the reactor core where the greatest amount of heat was being produced most quickly. It was estimated that this core heating and vaporization process happened in about 7.5 milliseconds, before enough steam had been formed to shut down the reaction, beating the steam shutdown by a few milliseconds. A key statistic makes it clear why the core blew apart: the reactor designed for a 3 MW power output operated momentarily at a peak of nearly 20 GW, a power density over 6,000 times higher than its safe operating limit.
Events after the power excursion
There were no other people at the reactor site. The ending of the nuclear reaction was caused solely by the design of the reactor and the basic physics of heated water and core elements melting, separating the core elements and removing the moderator.
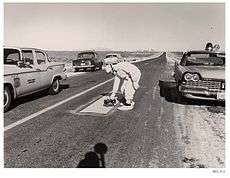
Heat sensors above the reactor set off an alarm at the central test site security facility at 9:01 p.m. MST, the time of the incident. False alarms had occurred in the morning and afternoon that same day. The first response crew, of six firemen (Ken Dearden Asst Chief, Mel Hess Lt., Bob Archer, Carl Johnson, Egon Lamprecht, Gerald Stuart, & Vern Conlon), arrived nine minutes later, expecting another false alarm[14] and initially noticed nothing unusual, with only a little steam rising from the building, normal for the cold 6 °F (−14 °C) night. The control building appeared normal. The firefighters entered the reactor building and noticed a radiation warning light. Their radiation detectors jumped sharply to above their maximum range limit as they were climbing the stairs to SL-1's floor level. They were able to peer into the reactor room before withdrawing.[14]
At 9:17 p.m., a health physicist arrived. He and a fireman, both wearing air tanks and masks with positive pressure in the mask to force out any potential contaminants, approached the reactor building stairs. Their detectors read 25 röntgens per hour (R/hr) as they started up the stairs, and they withdrew.
Some minutes later, a health physics response team arrived with radiation meters capable of measuring gamma radiation up to 500 R/hr—and full-body protective clothing. One health physicist and two firefighters ascended the stairs and, from the top, could see damage in the reactor room. With the meter showing maximum scale readings, they withdrew rather than approach the reactor more closely and risk further exposure.
Around 10:30 p.m. MST, the supervisor for the contractor running the site (Combustion Engineering) and the chief health physicist arrived. They entered the reactor building around 10:45 pm and found two mutilated men soaked with water: one clearly dead (Byrnes), the other moving slightly (McKinley) and moaning. With one entry per person and a 1-minute limit, a team of 5 men with stretchers recovered the operator who was still breathing around 10:50; he did not regain consciousness and died of his head injury at about 11 p.m. Even stripped, his body was so contaminated that it was emitting about 500 R/hr. Meanwhile, the third man was discovered about 11 p.m., impaled to the ceiling. With all potential survivors now recovered, safety of rescuers took precedence and work was slowed to protect them.
On the night of January 4, a team of six volunteers used a plan involving teams of two to recover the body of Byrnes. Radioactive gold 198Au from the man's gold watch buckle and copper 64Cu from a screw in a cigarette lighter subsequently proved that the reactor had indeed gone prompt critical. Up until the recovery of products of neutron exposure from the men's belongings, scientists had doubted that a nuclear excursion had occurred, thinking it inherently safe. These findings ruled out early speculations that a chemical explosion caused the accident.[9]
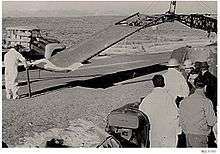
The third man was discovered last because he was pinned to the ceiling above the reactor by a shield plug and not easily recognizable.[6] On January 9, in relays of two at a time, a team of ten men, allowed no more than 65 seconds exposure each, used sharp hooks on the end of long poles to pull Legg's body free of the shield plug, dropping it onto a 5-by-20-foot (1.5 by 6.1 m) stretcher attached to a crane.[6]
The bodies of all three were buried in lead-lined caskets sealed with concrete and placed in metal vaults with a concrete cover. Some highly radioactive body parts were buried in the Idaho desert as radioactive waste. Army Specialist Richard Leroy McKinley is buried in section 31 of Arlington National Cemetery.
Some sources and eyewitness accounts confuse the names and disposition of each victim.[6] In Idaho Falls: The untold story of America's first nuclear accident,[15] the author indicates that Byrnes was the man found alive initially, Legg's body was recovered the night after the accident, and that McKinley was impaled by the control rod.
Cause
One of the required maintenance procedures called for the central control rod to be manually withdrawn approximately 4 inches (10 cm) in order to attach it to the automated control mechanism from which it had been disconnected. Post-incident calculations estimate that the main control rod was actually withdrawn approximately 26 inches (66 cm), causing the reactor to go prompt critical, which resulted in the steam explosion. The fuel, portions of the fuel plates, and water surrounding the fuel plates vaporized in the extreme heat. The expansion caused by this heating process caused water hammer as water was accelerated upwards toward the reactor vessel head, producing approximately 10,000 pounds per square inch (69,000 kPa) of pressure on the head of the reactor vessel when water struck the head at 160 feet per second (50 m/s).[16]
The water hammer not only caused extreme physical damage and distortion of the reactor vessel, it also caused the shield plugs of the vessel to be ejected, one of which impaled Legg. The most surprising and unforeseen evidences of the steam explosion and water hammer were the impressions made on the ceiling above the reactor vessel when it jumped over 9 feet (2.7 m) in the air before settling back into its prior location. The post-incident analysis also concluded that the reactor vessel was dry, since most of the water and steam had been either ejected immediately or evaporated due to the heat inside the reactor.
It was water hammer that caused the physical damage to the reactor, the deaths of personnel who stood atop and nearby, and the release of radioactive isotopes to the environment. One of the lessons learned from SL-1 was that there is an extreme water hammer hazard whenever a shutdown reactor is cooled to room temperature and there is an air gap between the top of the water and the reactor vessel head. One of the recommendations in the analysis of the incident was that shutdown reactors be filled to the top with water so that a power excursion could not induce such a powerful water hammer. Air is not dense enough to appreciably slow water, while water (being nearly incompressible) is able to distribute explosive forces and limit peak pressure. The extra water is also a very effective radiation shield for those who are directly above the vessel. Written procedures at SL-1 had included a directive to pump down the level of water in the reactor prior to the maintenance procedure that destroyed it.
The most common theories proposed for the withdrawal of the rod so far are (1) sabotage or suicide by one of the operators, (2) a suicide-murder involving an affair with the wife of one of the other operators, (3) inadvertent withdrawal of the main control rod, or (4) an intentional attempt to "exercise" the rod (to make it travel more smoothly within its sheath).[17][18] The maintenance logs do not address what the technicians were attempting to do, and thus the actual cause of the incident will never be known. The investigation took almost two years to complete.
Investigators analyzed the flux wires installed during the maintenance to determine the power output level. They also examined scratches on the central control rod. Using this data, they concluded that the central rod had been withdrawn 26.25 inches (66.7 cm).[9] The reactor would have been critical at 23 inches (58.4 cm), and it took approximately 100 ms for the rod to travel the final 3.25 inches (8.3 cm). Once this was calculated, experiments were conducted with an identically weighted mock control rod to determine whether it was possible or feasible for one or two men to have performed this. Experiments included a simulation of the possibility that the 84-pound (38 kg) rod was stuck and one man freed it himself, reproducing the scenario that investigators considered the best explanation: Byrnes broke the control rod loose and withdrew it accidentally, killing all three men.[6]
At SL-1, control rods would get stuck in the control rod channel sporadically. Numerous procedures were conducted to evaluate control rods to ensure they were operating properly. There were rod drop tests and scram tests of each rod, in addition to periodic rod exercising and rod withdrawals for normal operation. From February 1959 to November 18, 1960, there were 40 cases of a stuck control rod for scram and rod drop tests and about a 2.5% failure rate. From November 18, 1960 to December 23, 1960, there was a dramatic increase in stuck rods, with 23 in that time period and a 13.0% failure rate. Besides these test failures, there were an additional 21 rod sticking incidents from February 1959 to December 1960; 4 of these had occurred in the last month of operation during routine rod withdrawal. The central control rod, No. 9, had the best operational performance record even though it was operated more frequently than any of the other rods.
Rod sticking has been attributed to misalignment, corrosion product build-up, bearing wear, clutch wear, and drive mechanism seal wear. Many of the failure modes that caused a stuck rod during tests (like bearing and clutch wear) would only apply to a movement performed by the control rod drive mechanism. Since the No. 9 rod is centrally located, its alignment may have been better than Nos. 1, 3, 5, and 7 which were more prone to sticking. After the accident, logbooks and former plant operators were consulted to determine if there had been any rods stuck during the reassembly operation that Byrnes was performing. One person had performed this about 300 times, and another 250 times; neither had ever felt a control rod stick when being manually raised during this procedure. Furthermore, no one had ever reported a stuck rod during manual reconnection.
The mechanical and material evidence, combined with the nuclear and chemical evidence, forced them to believe that the central control rod had been withdrawn very rapidly. […] The scientists questioned the [former operators of SL-1]: “Did you know that the reactor would go critical if the central control rod were removed?” Answer: “Of course! We often talked about what we would do if we were at a radar station and the Russians came. We’d yank it out.”— Susan M. Stacy, Proving the Principle, [9]
Consequences
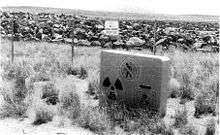
The remains of the SL-1 reactor are now buried near the original site at 43°31'02.9"N 112°49'22.2"W.[19]
The incident caused this design to be abandoned and future reactors to be designed so that a single control rod removal would not have the ability to produce the very large excess reactivity which was possible with this design. Today this is known as the "one stuck rod" criterion and requires complete shutdown capability even with the most reactive rod stuck in the fully withdrawn position. The reduced excess reactivity limits the possible size and speed of the power surge. It should be pointed out that the "one stuck rod" criterion did not originate as a result of the SL-1 incident. It was, in fact, a hard and fast design criterion long before the SL-1, from the beginning of the Naval Reactors program, under the leadership of Admiral Hyman Rickover. This design criterion started with the USS Nautilus, and continued throughout subsequent submarine and surface ship designs, and with the Shippingport civilian nuclear plant. It continues to be a rigid requirement for all US reactor designs to this day.
The incident also showed that in a genuine, extreme accident, both the melting of the core and the water to steam conversion would shut down the nuclear reaction. This demonstrates in a real accident one aspect of inherent safety of the water-moderated design against the possibility of a nuclear explosion.
A nuclear explosion requires sufficient force to hold the reacting nuclear components together for a short but necessary time. This is achieved in a nuclear fission weapon by surrounding the core with a carefully engineered tamper (typically U-238), and a shaped explosive charge. This, along with other subsystems of the weapon keep the supercritical mass together long enough for sufficient generations of the fission reaction to produce the desired yield. Lacking these restraints to hold the vaporized core components together, the components of a reactor fly apart, as in this incident. The reaction ends, resulting in a steam explosion and a badly damaged reactor core, but not the type of explosion as would be achieved with a nuclear weapon.
Although portions of the center of the reactor core had been vaporized briefly, very little corium was recovered. The fuel plates showed signs of catastrophic destruction leaving voids, but "no appreciable amount of glazed molten material was recovered or observed." Additionally, "There is no evidence of molten material having flowed out between the plates." It is believed that rapid cooling of the core was responsible for the small amount of molten material. There was insufficient heat generated for any corium to reach or penetrate the bottom of the reactor vessel. The reactor vessel was removed on November 29, 1961 without incident. The only holes in the bottom of the vessel were the ones bored through with borescopes to determine the condition of the melted core.
Even without an engineered containment building like those used today, the SL-1 reactor building contained most of the radioactivity, though iodine-131 levels on plants during several days of monitoring reached fifty times background levels downwind. Radiation surveys of the Support Facilities Building, for example, indicated high contamination in halls, but light contamination in offices.
Radiation exposure limits prior to the incident were 100 röntgens to save a life and 25 to save valuable property. During the response to the incident, 22 people received doses of 3 to 27 Röntgens full-body exposure.[20] Removal of radioactive waste and disposal of the three bodies eventually exposed 790 people to harmful levels of radiation.[21] In March 1962, the Atomic Energy Commission awarded certificates of heroism to 32 participants in the response.
The documentation and procedures required for operating nuclear reactors expanded substantially, becoming far more formal as procedures which had previously taken two pages expanded to hundreds. Radiation meters were changed to allow higher ranges for emergency response activities.
After a pause for evaluation of procedures, the Army continued its use of reactors, operating the Mobile Low-Power Reactor (ML-1), which started full power operation on February 28, 1963, becoming the smallest nuclear power plant on record to do so. This design was eventually abandoned after corrosion problems. While the tests had shown that nuclear power was likely to have lower total costs, the financial pressures of the Vietnam War caused the Army to favor lower initial costs and it stopped the development of its reactor program in 1965, although the existing reactors continued operating (MH-1A until 1977).
Cleanup
The site was cleaned in 1961 to 1962, removing the bulk of the contaminated debris and burying it. The massive cleanup operation included the dismantling and disposal of the reactor and building. A burial ground was constructed approximately 1,600 feet (500 m) northeast of the original site of the reactor. This was done to minimize radiation exposure to the public and site workers that would have resulted from transport of contaminated debris from SL-1 to the Radioactive-Waste Management Complex over 16 miles (26 km) of public highway. Original cleanup of the site took about 18 months. The entire reactor building, contaminated materials from nearby buildings, and soil and gravel contaminated during cleanup operations were disposed of in the burial ground. The majority of buried materials consist of soils and gravel.[22][23]
Recovered portions of the reactor core, including the fuel and all other parts of the reactor that were important to the incident investigation, were taken to the INEL's Test Area North for study. After the incident investigation was complete, the reactor fuel was sent to the Idaho Chemical Processing Plant for reprocessing. The reactor core minus the fuel, along with the other components sent to Test Area North for study, was eventually disposed of at the Radioactive Waste Management Complex.[22]
The SL-1 burial ground consists of three excavations, in which a total volume of 99,000 cubic feet (2800 m3) of contaminated material was deposited. The excavations were dug as close to basalt as the equipment used would allow and ranges from 8 to 14 feet (2.4 to 4.3 m) in depth. At least 2 feet (0.6 m) of clean backfill was placed over each excavation. Shallow mounds of soil over the excavations were added at the completion of cleanup activities in September 1962. The site and burial mound are collectively known as United States Environmental Protection Agency Superfund Operable Unit 5-05.[22][24]
Numerous radiation surveys and cleanup of the surface of the burial ground and surrounding area have been performed in the years since the SL-1 incident. Aerial surveys were performed by EG&G Las Vegas in 1974, 1982, 1990, and 1993. The Radiological and Environmental Sciences Laboratory conducted gamma radiation surveys every 3 to 4 years between 1973 and 1987 and every year between 1987 and 1994. Particle-picking at the site was performed in 1985 and 1993. Results from the surveys indicated that cesium-137 and its progeny (decay product) are the primary surface-soil contaminants. During a survey of surface soil in June 1994, "hot spots," areas of higher radioactivity, were found within the burial ground with activities ranging from 0.1 to 50 milliroentgen (mR)/hour. On November 17, 1994, the highest radiation reading measured at 2.5 feet (0.75 m) above the surface at the SL-1 burial ground was 0.5 mR/hour; local background radiation was 0.2 mR/hour. A 1995 assessment by the EPA recommended that a cap be placed over the burial mounds. The primary remedy for SL-1 was to be containment by capping with an engineered barrier constructed primarily of native materials.[22] This remedial action was completed in 2000 and first reviewed by the EPA in 2003.[24]
Movies and books

The U.S. Government produced a film about the incident for internal use in the 1960s. The video was subsequently released and can be viewed at The Internet Archive[25] and YouTube. SL-1 is the title of a 1983 movie, written and directed by Diane Orr and C. Larry Roberts, about the nuclear reactor explosion.[21] Interviews with scientists, archival film, and contemporary footage, as well as slow-motion sequences, are used in the film.[26][27] The events of the incident are also the subject of one book: Idaho Falls: The untold story of America's first nuclear accident (2003)[15] and 2 chapters in Proving the Principle - A History of The Idaho National Engineering and Environmental Laboratory, 1949-1999 (2000).[28]
In 1975 the anti-nuclear book We Almost Lost Detroit, by John G. Fuller was published, referring at one point to the Idaho Falls incident. Prompt Critical is the title of a 2012 short film, viewable on Youtube.com, written and directed by James Lawrence Sicard, dramatizing the events surrounding the SL-1 incident.[29] A documentary about the incident was shown on the History Channel.[30]

Another author, Todd Tucker, studied the incident and published a book detailing the historical aspects of nuclear reactor programs of the U.S. military branches. Tucker used the Freedom of Information Act to obtain reports, including autopsies of the victims, writing in detail how each person died and how parts of their bodies were severed, analyzed, and buried as radioactive waste.[6] The autopsies were performed by the same pathologist known for his work following the Cecil Kelley criticality accident. Tucker explains the reasoning behind the autopsies and the severing of victims' body parts, one of which gave off 1,500 R/hour on contact. Because the SL-1 accident killed all three of the military operators on site, Tucker calls it "the deadliest nuclear reactor incident in U.S. history."[31]
See also
- BORAX Experiments, 1953-4, which proved that the transformation of water to steam would safely limit a boiling water reactor power excursion, similar to that in this incident.
- International Nuclear Events Scale
- List of civilian nuclear accidents
- List of civilian radiation accidents
- List of military nuclear accidents
- List of nuclear reactors
- Nuclear contamination
- Nuclear power debate
- Nuclear power
- Nuclear safety
- Radiation
- Radioactive contamination
References
- ↑ Stacy, Susan M. (2000). "Chapter 16: The Aftermath" (PDF). Proving the Principle: A History of The Idaho National Engineering and Environmental Laboratory, 1949-1999 (PDF). U.S. Department of Energy, Idaho Operations Office. pp. 150–157. ISBN 0-16-059185-6.
- ↑ The Nuclear Power Deception Table 7: Some Reactor Accidents
- ↑ Horan, J. R., and J. B. Braun, 1993, Occupational Radiation Exposure History of Idaho Field Office Operations at the INEL, EGG-CS-11143, EG&G Idaho, Inc., October, Idaho Falls, Idaho.
- ↑ "Idaho: Runaway Reactor". Time. January 13, 1961. Retrieved July 30, 2010.
- ↑ Steve Wander (editor) (February 2007). "Supercritical" (PDF). System Failure Case Studies. NASA. 1 (4).
- 1 2 3 4 5 6 7 8 9 10 Tucker, Todd (2009). Atomic America: How a Deadly Explosion and a Feared Admiral Changed the Course of Nuclear History. New York: Free Press. ISBN 978-1-4165-4433-3. See summary:
- ↑ LA-3611 A Review of Criticality Accidents, William R. Stratton, Los Alamos Scientific Laboratory, 1967
- ↑ LA-13638 A Review of Criticality Accidents (2000 Revision), Thomas P. McLaughlin, et al., Los Alamos National Laboratory, 2000.
- 1 2 3 4 Stacy, Susan M. (2000). Proving the Principle - A History of The Idaho National Engineering and Environmental Laboratory, 1949-1999 (PDF). U.S. Department of Energy, Idaho Operations Office. ISBN 0-16-059185-6. Chapter 15.
- ↑ "Nuclear Experts Probe Fatal Reactor Explosion". Times Daily. January 5, 1961. Retrieved July 30, 2010.
- ↑ "Richard Legg" (JPEG). Find A Grave. 14 May 2011. Retrieved 5 March 2013.
- ↑ Spokane Daily Chronicle - Jan 4, 1961. The article notes that Byrnes was a "Spec. 5" from Utica, New York, McKinley was a "Spec. 4" from Kenton, Ohio, Legg was a "Navy electrician L.C." from Roscommon, Michigan.
- ↑ Lamarsh, John R.; Baratta, Anthony J. (2001). Introduction to Nuclear Engineering. Upper Saddle River, New Jersey: Prentice Hall. p. 783. ISBN 0-201-82498-1.
- 1 2 Berg, Sven (December 12, 2009). "Nuclear accident still mystery to rescue worker". The Argus Observer. Retrieved April 6, 2015.
- 1 2 McKeown, William (2003). Idaho Falls: The Untold Story of America's First Nuclear Accident. Toronto: ECW Press. ISBN 978-1-55022-562-4.,
- ↑ IDO-19313: ADDITIONAL ANALYSIS OF THE SL-1 EXCURSION; Final Report of Progress July through October 1962, November 21, 1962, Flight Propulsion Laboratory Department, General Electric Company, Idaho Falls, Idaho, U.S. Atomic Energy Commission, Division of Technical Information.
- ↑ ATOMIC CITY, by Justin Nobel Tin House Magazine, Issue #51, Spring, 2012.
- ↑ A Nuclear Family, By Maud Newton The New York Times Magazine, April 1, 2012.
- ↑ Mahaffey, James (2012). Nuclear Accidents and Disasters. Facts on File. p. 40. ISBN 978-0-8160-7650-5.
- ↑ Johnston, Wm. Robert. "SL-1 reactor excursion, 1961". Johnston's Archive. Retrieved 30 July 2010.
- 1 2 Maslin, Janet (March 21, 1984). "Sl-1 (1983): Looking at Perils of Toxicity". The New York Times. Retrieved July 30, 2010.
- 1 2 3 4 EPA Superfund Record of Decision: Idaho National Engineering Laboratory (USDOE) EPA ID: ID4890008952, OU 24, Idaho Falls, ID, 12/01/1995
- ↑ Record of Decision, Stationary Low-Power Reactor-1 and Boiling Water Reactor Experiment-I Burial Grounds (Operable Units 5-05 and 6-01), and 10 No Action Sites (Operable Units 5-01, 5-03, 5-04, and 5-11), January 1996.
- 1 2 2003 Annual Inspection Summary for the Stationary Low-Power Reactor Burial Ground, Operable Unit 5-05
- ↑ "SL-1 The Accident: Phases I and II".
- ↑ SL-1 at the Internet Movie Database
- ↑ SL-1 (1983)
- ↑ Stacy, Susan M. (2000). Proving the Principle: A History of The Idaho National Engineering and Environmental Laboratory, 1949-1999. U.S. Department of Energy, Idaho Operations Office. ISBN 0-16-059185-6.
- ↑ Prompt Critical on YouTube by James Lawrence Sicard.
- ↑ SL-1 Nuclear Accident on YouTube History Channel
- ↑ Secret Accidents and Lost Bombs
External links
| Wikimedia Commons has media related to SL-1 Reactor. |
- "SL-1 Reactor Accident on January 3, 1961, Interim Report", May 1961. From the above page. 15.5 MB PDF.
- "IDO Report on the Nuclear Incident at the SL-1 Reactor on January 3, 1961, at the National Reactor Testing Station, January 1962. 16.5 MB PDF. From the above page. This report has more accurate times for the events.
- "The SL-1 Accident - AEC Educational Documentary" on YouTube
- "The SL-1 Accident: Briefing Film Report" 1961 AEC" on YouTube
- Department of Energy Document: Nuclear Reactor Testing