Battle of Fromelles
| ||||||||||||||||||||||||||||||||||
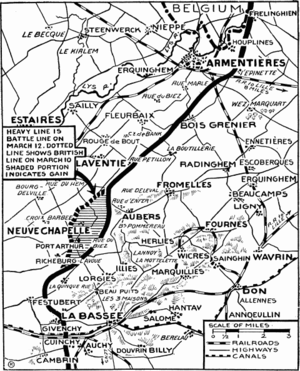

The Battle of Fromelles (French pronunciation: [fʁɔmɛl]; 19–20 July 1916) was a British military operation on the Western Front during World War I, subsidiary to the Battle of the Somme.[lower-alpha 1] General Headquarters (GHQ) of the British Expeditionary Force (BEF) had ordered the First and Second armies to prepare attacks to support the Fourth Army on the Somme 80 kilometres (50 mi) to the south, to exploit any weakening of the German defences opposite. The attack took place 16 kilometres (9.9 mi) from Lille, between the Fauquissart–Trivelet road and Cordonnerie Farm, an area overlooked from Aubers Ridge to the south. The ground was low-lying and much of the defensive fortification of both sides consisted of breastworks, rather than trenches.
The operation was conducted by XI Corps of the First Army with the 61st Division and the 5th Australian Division, Australian Imperial Force (1st AIF) against the 6th Bavarian Reserve Division, supported by two flanking divisions of the German 6th Army. Preparations for the attack were rushed, the troops involved lacked experience in trench warfare and the power of the German defence was significantly underestimated, the attackers being outnumbered 2:1. The advance took place in daylight, against defences overlooked by Aubers Ridge, on a narrow front which left German artillery on either side free to fire into the flanks of the attack. A renewal of the attack by the 61st Division early on 20 July was cancelled, after it was realised that German counter-attacks had already forced a retirement by the Australian troops to the original front line.
On 19 July, General von Falkenhayn, the German Chief of the General Staff, had judged the British attack to be a long-anticipated offensive against the 6th Army. On the next day when the effect of the attack was known and a captured operation order from XI Corps revealed the limited intent of the operation, Falkenhayn ordered the Guard Reserve Corps to be withdrawn to reinforce the Somme front. The Battle of Fromelles had inflicted some losses on the German defenders but gained no ground nor deflected many German troops bound for the Somme. The attack was the début of the AIF on the Western Front and the Australian War Memorial described the battle as "the worst 24 hours in Australia's entire history".[2] Of 7,080 BEF casualties, 5,533 losses were incurred by the 5th Australian Division; German losses were 1,600–2,000, with 150 taken prisoner.
Background
The course of the Battle of the Somme (1 July – 18 November 1916) had led the British GHQ on 5 July to inform the commanders of the three other British armies that the German defences from the Somme north to the Ancre river might soon fall. The First and Second army commanders were required to choose places to penetrate the German defences, if the attacks on the Somme continued to make progress. Any gaps made were then to be widened, to exploit the weakness and disorganisation of the German defence. The Second Army commander, General H. Plumer was occupied by preparations for an offensive at Messines Ridge but could spare one division for a joint attack with the First Army at the army boundary. On 8 July, the First Army commander General Charles Monro, ordered the IX Corps commander Lieutenant-General Richard Haking to plan a two-division attack; Haking proposed to capture Aubers Ridge, Aubers and Fromelles but next day Monro dropped Aubers Ridge from the attack, as he and Plumer had concluded that with the troops available, no great objective could be achieved.[3]
On 13 July, after receiving intelligence reports that the Germans had withdrawn approximately nine infantry battalions from the Lille area from 9–12 July, GHQ informed the two army commanders that a local attack was to be carried out at the army boundary around 18 July, to exploit the depletion of the German units in the vicinity. Haking was ordered to begin a preliminary bombardment, intended to appear to be part of a large offensive, while limiting an infantry attack to the German front line.[3] On 16 July discussions about the attack resumed, as the need for diversions to coincide with operations on the Somme had diminished when the big victory of Bazentin Ridge (14 July 1916) had not led to a general German collapse. Sir Douglas Haig the Commander-in-Chief of the BEF, did not want the attack to take place unless the local commanders were confident of success and Monro and Haking opposed postponement or cancellation of the attack. The weather had been dull on 15 July and rain began next day, soon after Monro and Haking made the decision to proceed with the attack. Zero hour for the main bombardment was then postponed because of the weather and at 8:30 a.m. Haking delayed the attack for at least 24 hours; after considering cancellation, Monro postponed the attack to 19 July.[4]
Prelude
British offensive preparations

The Second Army provided the 5th Australian Division, the artillery of the 4th Australian Division and heavy guns and trench mortars to XI Corps, to participate in an attack from the Fauquissart–Trivelet road to La Boutillerie with the 31st Division and 61st Division. A shortage of artillery and the lack of training and experience in the Australian divisional artilleries and some of the heavy batteries, led to the attack front being reduced to 4,000 yards (3,700 m) between the Fauquissart–Trivelet road and Delangre Farm. The ground to be attacked was waterlogged, flat and easily overlooked from Aubers Ridge, behind the German front line to the south. The 39th Division and 31st Division moved their boundaries north as the 61st Division concentrated along its attack front from the Fauquissart–Trivelet road to Bond Street. The 20th Division moved its boundary south to Cordonnerie Farm to take over the left of the 5th Australian Division, which concentrated the divisional frontage from Cordonnerie Farm to Bond Street. The twelve attacking battalions were supported by more artillery than at Aubers Ridge in May 1915, when a similar number of battalions attacked in the same area. More ammunition was available than in 1915 and trench mortars were added to the artillery for wire-cutting. With support from First Army artillery to the south, 296 field guns and 78 heavy guns were ready, which gave a greater concentration of heavy artillery than that of the Fourth Army on the first day of the Somme.[5][lower-alpha 2]
After several postponements for weather, on 18 July visibility increased and the artillery bombardment proceeded. The bombardment of the German front at La Bassée was repeated and provoked retaliation from the German artillery. Overnight British infantry patrols reported that no movement was visible in the German lines, which appeared to be weakly held. German covering parties stopped Australian raiders, on the right flank of the 5th Australian Division front, where the wire appeared to be intact except for gaps on the left. 19 July began hazy but the time of the artillery zero hour was fixed for 11:00 a.m., ready for the infantry attack to begin at 6:00 p.m. A special heavy artillery bombardment began on the Sugarloaf at 2:35 p.m. by which time a German counter-bombardment was falling on all of the attack front, causing casualties to the Australians and the field artillery crews of the 61st Division at Rue Tilleloy. Several ammunition dumps were exploded and the decoy lifts by the British artillery failed to deceive the Germans. The Australian and British infantry began to move into no man's land at 5:30 p.m.[7]
British plan of attack
The German salient at Fromelles contained some higher ground facing north-west, known as the Sugarloaf.[8] The small size and height of the salient gave the Germans observation of no man's land on either flank.[9] The Australian 5th Division, under Major General J.W. McCay was to attack the left flank of the salient by advancing south[10] as the 61st Division attacked the right flank from the west.[8] Each division was to attack with its three brigades in line, with two battalions from each brigade in the attack and the other two in reserve, ready to take over captured ground or to advance further. Haking issued the attack orders on 14 July, when wire-cutting began along the XI Corps front. It was intended that the bombardment would inflict mass casualties on the German infantry, reducing them to a "state of collapse". The British infantry were to assemble as close to the German lines as possible, no man's land being 100–400 yards (91–366 m) wide, before the British artillery fire was lifted from the front line; then the infantry would rush the surviving Germans while they were disorganised, advancing to the German second line.[11] Heavy artillery began registration and a slow bombardment on 16 July and two days of bombardment began either side of La Bassée canal as a diversion. The main bombardment was to begin at midnight on 17/18 July for seven hours (rainy weather forced a postponement). Over the final three hours the artillery was to lift and the infantry show bayonets and dummy figures several times, to simulate an infantry advance and then the artillery was to resume bombardment of the front line, to catch the German infantry out of cover.[6]
German defensive preparations

Von Falkenhayn had ordered a construction programme on the Western Front in January 1915, to make it capable of being defended indefinitely by a small force against superior numbers. A more elaborate and fortified front line was built with fields of barbed wire and carefully sited and camouflaged concrete machine-gun nests, with another trench close behind to shelter the trench garrison, during bombardments of the front line. To evade Allied long-range artillery-fire, intended to obstruct the movement of reinforcements from the new rear defences, communication trenches were built. The front line was to be held at all costs as the main line of resistance but in May 1915 Falkenhayn ordered a reserve line to be built along all of the Western Front, 2,000–3,000 yards (1,800–2,700 m) behind the front line, out of range of enemy field artillery, to contain any breakthrough and be occupied opposite a sector broken into, as jumping-off points by counter-attacking troops. If counter-attacks failed to recover the front line, the rear position could be connected to the un-captured parts of the front line on either side. The construction programme was a huge undertaking, which took until autumn 1915 and had several opponents, notably the 6th Army commander Crown Prince Rupprecht, who claimed that a rear line would undermine the determination of soldiers to stand their ground.[12] The front of the 6th Army had been quiet since the Battle of Loos (25 September – 14 October 1915). In July 1916 the 6th Bavarian Reserve Division held a 4.5-mile (7.2 km) stretch of the front line with four regiments, from east of Aubers village, north to a point near Bois Grenier, each regiment having one battalion in the front line, one in support and one in reserve.[13] On one regimental front there were 75 shelters with 9–12 inches (230–300 mm) of concrete protection. After a British gas attack late on 15 July opposite Neuve Chapelle and Fauquissart, German artillery bombarded the British front line and a raid by 100 troops of Bavarian Reserve Regiment 21 on the Australian lines, caused nearly 100 casualties and took three prisoners for a loss of 32 casualties.[14]
Battle
First Army
In the 61st Division area, infantry of the 182nd Brigade on the right flank, began to move into no man's land at 5:30 p.m. through sally-ports, some of which were under fire from German machine-gunners and became "death-traps". Two companies of the right-hand battalion managed to get within 50 yards (46 m) of the German parapet with few losses and rushed the breastwork as the artillery lifted, finding the wire cut and the Germans incapable of resistance. Uncut wire held up the advance to the second line and German machine-gun fire from the right flank caused many casualties, as the survivors reached the objective. Reinforcements reached the front trench but the German flanking fire caused many casualties and German artillery began to bombard the captured area. The left-hand battalion lost more casualties in no man's land, then found the wire at the Wick salient uncut. German machine-guns caused many casualties and the few infantry who got through the wire, were shot down in front of the front trench, as reinforcements were also caught in no man's land and pinned down.[15] In the centre, the 183rd Brigade was bombarded before the advance and shrapnel-fire stopped the infantry using the sally-ports. After climbing the British parapet both battalions were shot down in no man's land, a few men getting close to the German wire before being killed or wounded. On the left, the attacking battalions of the 184th Brigade had been in the front line since the morning under German artillery-fire. On the right, the sally-ports were under fire and only a few troops reached the German wire (which was found to be uncut) before falling back. The left battalion's attack towards the Sugarloaf salient (which was beyond trench-mortar range) was stopped by German fire at the sally-ports and so the infantry tried to exit along "Rhondda Sap", under a shrapnel bombardment.[lower-alpha 3] Most of the battalion was destroyed, but some troops reached the north-east part of the salient and tried to enter the German breastwork, until all became casualties.[17]

On the 5th Australian Division front, the troops attacked over the parapet and had fewer losses than the 61st Division. The 15th (Victoria) Brigade advanced next to the British 183rd Brigade, towards the junction of the German line and Layes brook, which ran diagonally across no man's land. The right battalion advance was stopped after 300 yards (270 m) by machine-gun fire from the Sugarloaf and the left hand battalion was stopped at the German wire, both battalions suffering many losses as the survivors dug in. In the Australian centre the 14th (NSW) Brigade had fewer casualties, reached the German front line and took a number of prisoners. When the Australians advanced further they found only flat fields and ditches full of water. A line was selected for consolidation and ten machine-guns were sent forward. The 8th Brigade battalions attacked through machine-gun fire from the front and flanks. A 1,200-pound (540 kg) mine was blown on the outer flank with the intention of creating a crater lip that would screen the attacking infantry but when the Australians reached the German breastwork they pressed on, finding the same terrain as the 14th Brigade.[lower-alpha 4] The 32nd Battalion, on the eastern flank, suffered heavy casualties while attacking a German stronghold in the ruins of Delangre Farm. Elements of the 14th Brigade reached a main road 400 metres (440 yd) south of the German line, before withdrawing to the ditch.[19] The Australian 8th and 14th Brigades had gained their objectives and captured about 1,000 metres (1,100 yd) of the German front line.[10] A line was selected for consolidation and a strong-point built at the end of Kasten Weg, a German communication trench. Reinforcements with equipment and tools went forward and digging began on a communication trench across no man's land, as a German artillery barrage fell and all movement was fired on by machine-guns.[20]
By 7:00 p.m. accurate reports reached the 61st Division commander, Major-General C. J. Mackenzie of the success on the right and erroneous reports of limited success in the centre and a small lodgement on the Sugarloaf. Mackenzie was ordered by Haking at 7:30 p.m. to attack again at the Sugarloaf to assist the Australians, before it was discovered that the 184th Brigade had not reached it. The Australian 15th Brigade was asked to co-operate with the British attack and the 58th Battalion was sent forward. A renewed bombardment continued, as preparations were made to attack all along the front at 9:00 p.m., when at 8:20 p.m. Haking cancelled the attack and ordered that all troops were to be withdrawn after dark. Reinforcements for the 182nd Brigade received the order in time but the troops in the German line were overwhelmed, with only a few wounded and stragglers returning. Troops pinned down in no man's land withdrew under cover of the bombardment and parties went out to rescue wounded. More discussion between Mackenzie and Haking led to a decision that the 184th Brigade would attack the Sugarloaf overnight after a ten-minute hurricane bombardment; German shelling on the British front line then caused a postponement until the morning.[21]
%2C_19_July_1916.png)
The postponement failed to reach the Australian 58th Battalion, which attacked with some of the 59th Battalion and was stopped in no man's land with many casualties, survivors from three battalions finding their way back after dark. Despite reinforcements, the situation of the 14th Brigade troops in the German lines became desperate, as artillery fire and German counter-attacks from the open right flank forced a slow withdrawal in the dark. On the left flank, more troops were sent forward with ammunition to the 8th Brigade at dusk and at 2:00 a.m. every soldier who could be found was sent forward. Consolidation in the German lines was slow as the troops lacked experience, many officers were casualties and there was no dry soil to fill sandbags, mud being substituted. German counter-attacks on the front and flanks, with machine-gun fire from Delangre Farm, De Mouquet Farm and "The Tadpole", began at 3:15 a.m. on 20 July, forcing a retirement to the German first line and then a withdrawal to the original front line. During the withdrawals some troops managed to fight their way out but many were cut off and captured.[22]
News of the 8th Brigade retirement reached McCay, the Australian divisional commander, at a meeting with Mackenzie, Haking and Monro to plan the new 61st Division attack. Monro ordered the 14th Brigade to be withdrawn and at 5:40 a.m. a box-barrage around the 14th Brigade began. At 7:50 a.m. the order to retire arrived, although it was not received by some parties. German troops had got well behind the right flank and fired at every sign of movement, forcing the Australians to withdraw along the communication trench dug overnight. By 9:00 a.m. the remnants of the 53rd, 54th and 55th Battalions had returned; many wounded were rescued but only four of the machine-guns were recovered. Artillery-fire from both sides diminished and work began on either side of no man's land to repair defences; a short truce was arranged by the Germans and Australians to recover their wounded.[23]
Air operations
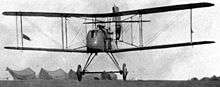
From 14 July the road from Illies to Beaucamps, 3 miles (4.8 km) behind the German front line was kept under air observation. On 16 July 16 Squadron joined 10 Squadron, Royal Flying Corps (RFC) on the attack front along with a kite balloon section, bringing the I Brigade squadrons of the RFC in support of the attack up to three corps squadrons and two army squadrons. The corps aircraft photographed and reconnoitred the area before the attack and flew artillery-observation and contact patrols during the battle.[lower-alpha 5] Army squadrons flew further afield and denied German reconnaissance aircraft view of British troop movements, particularly behind the XI Corps front. On 19 July, aircraft from two squadrons patrolled the area towards Lille and had numerous air fights, in which two Fokkers and a British DH.2 were shot down. Bombing raids on German army billets, supply dumps and the railways from Lille to Lens, Douai, Cambrai and Valenciennes also took place.[25]
German 6th Army


Opposite the British right, Bavarian Reserve Regiment 17 lost a switch trench facing Trivelet and then a second line was overrun, with the garrison being lost.[26] The left of III Battalion to the south of the Trivelet road, began bombing to its right and part of I Battalion attacked frontally and from the right, taking 61 prisoners.[27] On the Australian flank, III Battalion, Bavarian Reserve Regiment 21 was pushed back in the centre and on its right, forming a defensive flank at Kasten Weg and in front of Delangre Farm.[28] The right flank of III Battalion, Bavarian Reserve Regiment 16 repulsed the 15th Australian Brigade and was then reinforced by the II Battalion from Rue Delaval, which joined with the left of III Battalion, Bavarian Reserve Regiment 21. A counter-attack ordered by the divisional commander at 8:00 p.m., fell into confusion in the dark, under British artillery-fire and an attack on the 8th Australian Brigade, by part of I Battalion, Bavarian Reserve Regiment 21 was stopped by Australian small-arms fire. Later on, two other companies attacked up Kasten Weg as I Battalion, Bavarian Reserve Regiment 21 and half of Bavarian Reserve Regiment 20 attacked from the flank, reaching the old front line at 6:00 a.m. on 20 July. The right flank of the 14th Australian Brigade was counter-attacked by most of I Battalion, Bavarian Reserve Regiment 16, which joined the II Battalion, and recaptured the front line step-by-step, until dawn when a pause was ordered due to exhaustion and lack of ammunition and grenades. When the attack resumed the troops met those of Bavarian Reserve Regiment 21 at around 8:10 a.m.[23] German artillery support was less extensive than that available to the attackers but managed to "smother the British trenches with fire" as the artillery of the 50th Reserve Division and 54th Reserve Division fired from the flanks "thus the backbone of the British (sic) attack was broken before it left the trenches at 5:30 p.m.".[29]
Aftermath
Analysis
Neither division was well-prepared for the attack. The 61st Division had disembarked in France in late May 1916, after delays in training caused by equipment shortages and the supplying of drafts to the 48th Division. The division entered the front line for the first time on 13 June and every man not part of the attack spent 16–19 July removing poison gas cylinders from the front line, when the discharge on 15 July was suspended due to the wind falling; 470 cylinders were removed before the work was stopped because the men were exhausted. The 5th Australian Division had arrived in France only days before the attack and relieved the 4th Australian Division on the right flank of the Second Army by 12 July.[10] The Australian divisional artillery and some of the heavy artillery had no experience of Western Front operations and a considerable shuffling of divisions had already taken place, as I Anzac Corps prepared to move south to the Somme front, which hampered preparations for the attack.[30]
The attack failed as a diversion, when its limited nature quickly became obvious to the German commanders.[lower-alpha 6] A German assessment (16 December 1916) called the attack "operationally and tactically senseless" and prisoner interrogations revealed that the Australian troops were physically imposing but had "virtually no military discipline" and "no interest in soldiering as it was understood in Europe".[32] A German report (30 July 1916) recorded that captured officers said that the Australians made a fundamental mistake in trying to hold the German second trench, rather than falling back to the front trench and consolidating. When the 15th Australian Brigade was pinned down in no man's land, the continuity of the attack broke down and lost protection against flanking fire from the right, which enabled German troops to counter-attack, regain the first trench and cut off the Australian troops further forward.[33]
A communiqué, released to the press by British GHQ, was not favourably received by the Australians. "Yesterday evening, south of Armentières, we carried out some important raids on a front of two miles in which Australian troops took part. About 140 German prisoners were captured".[34] Australian losses, and doubts about the judgement of higher commanders, damaged relations between the AIF and the British, with further doubts about the reliability of British troops spreading in Australian units.[35] In 2008, Grey wrote that McCay also made errors in judgement that contributed to the result, citing McCay's order not to consolidate the initial gains and that poor planning, ineffective artillery support and Australian lack of experience of Western Front conditions, contributed to the failure.[10] A number of senior Australian officers were removed after the débâcle and the 5th Australian Division remained incapable of offensive action until late summer, when it began trench-raiding.[36] In October the 6th Bavarian Reserve Division, with morale high after the defensive success at Fromelles, was sent to the Somme front and never recovered from the ordeal; Bavarian Reserve Regiment 16 spent ten days in the line and lost 1,177 casualties.[37][lower-alpha 7]
Casualties
The battle caused one of the greatest numbers of Australian deaths in action in 24 hours, although this was surpassed by the Battle of Bullecourt in 1917.[lower-alpha 8] The 5th Australian Division lost 5,513 casualties, 2,000 men in the 8th Brigade, 1,776 men of the 15th Brigade, 1,717 men in the 14th Brigade and 88 men from the divisional engineers; two battalions had so many casualties that they had to be rebuilt. Of 887 personnel from the 60th Battalion, only one officer and 106 other ranks survived unwounded and the 32nd Battalion suffered 718 casualties. The 31st Battalion had 544 casualties and the 32nd Battalion lost 718 men killed and wounded.[39][40] The 61st Division was already understrength before the battle, engaged half as many men as the 5th Australian Division and lost 1,547 casualties. German casualties in the 6th Bavarian Reserve Division were 1,600–2,000 men.[23] Allied soldiers killed in the area that was re-taken by the Germans, were buried shortly after the battle. The burial pits were photographed from a British reconnaissance aircraft on 21 July but marked as dugouts or trench-mortar positions. The bodies were taken by narrow gauge trench railway on 22 July and buried in eight 10-by-2.2-by-5-metre (32.8 ft × 7.2 ft × 16.4 ft) pits.[41]
Commemoration
New cemetery
Most war graves on the Western Front were discovered by official surveys during the 1920s; British and Empire dead were reburied in Imperial War Graves Commission cemeteries. 400 unknown Australian soldiers killed in the Battle of Fromelles were re-buried at the V.C. Corner Australian Cemetery and Memorial, 2-kilometre (1.2 mi) north-west of Fromelles (the only large exclusively Australian cemetery in France). Mortal remains of those killed in no man's land were recovered after the war and buried at V.C. Corner British Cemetery. In 2002, Lambis Englezos was inspired by Corfield's Don't Forget Me Cobber (2000), to search for an unmarked mass grave near Fromelles. The site was found by Englezos and other researchers at 50°36′36.36″N 2°51′17.10″E / 50.6101000°N 2.8547500°E, near Fromelles at "le bois au fond du village", known as Fasanenwäldchen (Pheasant Copse/Pheasant Wood) by the Germans. The researchers believed that the pits had not been found after the war and gained support for an exploration of the site from the Australian Army and the British "All Party Parliamentary War Graves and Battlefield Heritage Group".[41][lower-alpha 9]
_Miltary_Cemetery.JPG)
In 2007, a geophysical survey was commissioned by the Australian government. The survey indicated that the pits had been undisturbed since the war and contained the remains of 337 soldiers. From 23 May – 13 June 2008, an exploratory dig found human remains, personal effects, webbing, brass fitments, uniform badges, buttons and British .303 ammunition in five of six pits, which were then refilled.[43][lower-alpha 10] Exhumations took place from May to September 2009, which recovered the mortal remains of 250 Allied soldiers, approximately 173 of whom were Australian, from which DNA samples were taken.[45][lower-alpha 11][lower-alpha 12] The original burial site was unsuitable and a new CWGC war cemetery was built about 120 metres (130 yd) away. On 30 January 2010, the first body was interred at Fromelles (Pheasant Wood) Military Cemetery and the remaining bodies were buried in individual ceremonies, by the Royal Regiment of Fusiliers and the Australian Army.[48] In March 2010, it was reported that 75 Australian soldiers killed at Fromelles had been identified from DNA.[49] On 19 July 2010, the 94th anniversary of the battle, the last soldier (who remained unknown) was buried.[50] The cemetery was dedicated in a broadcast public ceremony.[51]
Memorials and museum
There are several memorials in the Fromelles area commemorating the battle. The V.C. Corner Australian Cemetery and Memorial was built in the early 1920s, the Australian Memorial Park opened in 1998 and the Fromelles (Pheasant Wood) Military Cemetery was completed in 2010. There are other small cemeteries in the area with burials from the battle. In Fromelles Town Hall, there is a museum (Fromelles Weppes Terre de Mémoire), run by the Association pour le Souvenir de la Bataille de Fromelles (ASBF).[52] A new museum called 'Musee de la Bataille de Fromelles' is under construction. The plaque in it pays tribute to the pioneering work of Robin Corfield and Lambis Englezos in gaining wider attention to the battle and the loss of life of so many Australians, as well as British soldiers. The museum was originally scheduled to be opened on 19 July 2013 to coincide with the unveiling of some new headstones in the cemetery to mark other soldiers whose remains have been identified.
2016 memorial event controversy
In 2016, plans to hold a memorial event at the Pheasant Wood military cemetery were announced with the controversial decision to exclude British attendees from the ceremony. The move provoked anger amongst some families of the approximately 1,500 British casualties, with one quoted,
Families feel totally insulted by the attitude of the Australian authorities. Men from both countries fought together and died together but now the Australians want to airbrush the British out of the battle.[53]
In response, the Australian Department of Veterans Affairs said that a decision has been made by the Australian Government to prioritise Australians and French,
This is not to diminish the role of other nations but simply a recognition of the Australian focus of the event we are organising.— ADVA[54]
Footnotes
- ↑ The battle is known by a number of names, including Action at Fromelles and Battle of Fleurbaix. Attack at Fromelles was chosen by the (British) Battles Nomenclature Committee in 1922. In German it is known as Schlacht von Fromelles ("Battle of Fromelles").[1]
- ↑ Artillery support consisted of 60 × 2-inch mortars, 2 × 240 mm mortars, 232 × 18-pdr field guns, 64 × 4.5-inch howitzers, 22 × 6-inch howitzers, 8 × 9.2-inch howitzers, 5 × 12-inch howitzers, 40 × 60-pounder guns, 2 × 6-inch guns, 1 × 9.2-inch gun with 200,000 field gun shells, 15,000 field howitzer shells and 4,350 rounds for the heavy guns and howitzers.[6]
- ↑ The sap had been extended towards the German lines by Australian tunnellers, using a "pipe-pusher" to explode a charge 4–5 feet (1.2–1.5 m) deep and 220 feet (67 m) long; two more were exploded on the 183rd Brigade front, to provide cover for the removal of wounded.[16]
- ↑ "[t]he air was thick with bullets, swishing in a flat, criss-crossed lattice of death. Hundreds were mown down in the flicker of an eyelid, like great rows of teeth knocked from a comb." (W. H. "Jimmy" Downing)[18]
- ↑ On 30 January 1916, an RFC brigade was attached to each British army, divided into wings, a corps wing with squadrons responsible for close reconnaissance, photography and artillery observation on the front of each army corps and an army wing, which conducted long-range reconnaissance and bombing.[24]
- ↑ A recent essay (Senior, 2008) has argued that six German divisions were detained opposite XI Corps for about two months.[31]
- ↑ It is believed that Adolf Hitler, a corporal and a message runner in Bavarian Reserve Regiment 16, took part in the battle.[38]
- ↑ The number of Australian casualties was similar to the casualties of the 36th Division at Thiepval on 1 July 1916 and equivalent to Australian losses in the Boer War, Korean War and Vietnam War.[2]
- ↑ Cobb cited the late 1990s, April 2002 comes from Englezos in Corfield, 2009.[42]
- ↑ Daily press briefings were given by Dr Tony Pollard (military archaeologist) and Major-General O'Brien; later the dig was described by Pollard and Peter Barton (historian) in video footage of the excavation.[44]
- ↑ Aspects of the exhumations were controversial and some people wanted the burials to remain undisturbed, claims were made that the work was too rushed for satisfactory analysis of the DNA and press complaints were made of cheapskating by the contractor. A Belgian archaeologist Johan Vandewalle, seconded to the Fromelles project, called the methods of Oxford Archaeology a "nightmare" and claimed that the site had been poorly protected against the weather, claims which were supported by Barton and rejected by the contractor.[46]
- ↑ The contractor refused Englezos access to the site, until this was reported in the Sydney Morning Herald. Englezos was allowed back, briefed members of the project team on details of the battle and guided them around the battlefield.[46] (On 7 June 2009 Englezos was made a Member of the Order of Australia (AM) in the General Division, for his work on the project.)[47]
Citations
- ↑ James 1924, p. 11.
- 1 2 McMullin 2006.
- 1 2 Miles 1938, pp. 119–121.
- ↑ Miles 1938, pp. 125–126.
- ↑ Miles 1938, pp. 121–122.
- 1 2 Miles 1938, p. 123.
- ↑ Miles 1938, pp. 126–127.
- 1 2 Coulthard-Clark 1998, pp. 116–117.
- ↑ Miles 1938, p. 121.
- 1 2 3 4 Grey 2008, pp. 102–103.
- ↑ Miles 1938, pp. 123–124.
- ↑ Wynne 1939, pp. 16–17.
- ↑ Miles 1938, p. 122.
- ↑ Miles 1938, p. 124.
- ↑ Miles 1938, pp. 127–128.
- ↑ Miles 1938, p. 128.
- ↑ Miles 1938, pp. 128–129.
- ↑ McMullin 2006, p. 36.
- ↑ Miles 1938, pp. 131–133.
- ↑ Miles 1938, pp. 130–131.
- ↑ Miles 1938, pp. 129–130.
- ↑ Miles 1938, p. 132.
- 1 2 3 Miles 1938, p. 133.
- ↑ Jones 1928, pp. 147–148.
- ↑ Jones 1928, pp. 326–327.
- ↑ Miles 1938, p. 127.
- ↑ Miles 1938, p. 129.
- ↑ Miles 1938, p. 131.
- ↑ Miles 1938, p. 134.
- ↑ Miles 1938, pp. 121–122, 124.
- ↑ Sheffield 2011, p. 178.
- ↑ Duffy 2007, pp. 57–58.
- ↑ Duffy 2007, p. 186.
- ↑ Miles 1938, pp. 134–135.
- ↑ Sheffield 2003, p. 94.
- ↑ Bean 1929, p. 447.
- ↑ Philpott 2009, p. 392.
- ↑ Williams 2005, pp. 134–146.
- ↑ Ellis 1920, p. 112.
- ↑ Bean 1929, p. 442.
- 1 2 Cobb 2007, pp. 183–184.
- ↑ Corfield 2009, p. xi.
- ↑ Cobb 2007, pp. 184–185.
- ↑ Cobb 2007, p. 184.
- ↑ Cobb 2007, pp. 185–186.
- 1 2 Totaro 2009.
- ↑ WA Today 2009.
- ↑ Cobb 2007, pp. 187–188.
- ↑ McPhedran 2010.
- ↑ Braithwaite 2010.
- ↑ Greene 2010.
- ↑ ASBF 2002.
- ↑ The Australian 2016.
- ↑ Aubrey 2016.
References
- Books
- Bean, C. E. W. (1941) [1929]. The Australian Imperial Force in France: 1916. Official History of Australia in the War of 1914–1918. III (12th ed.). Sydney: Angus and Robertson. OCLC 271462387.
- Cobb, P. (2010) [2007]. Fromelles 1916 (repr. ed.). Stroud, UK: The History Press. ISBN 978-0-7524-5601-0.
- Corfield, R. (2000). Don't Forget Me Cobber: The Battle of Fromelles. Carlton, Victoria: Melbourne University Publishing. ISBN 1-87658-618-4.
- Corfield, R. (2009) [2000]. Don't Forget Me Cobber: The Battle of Fromelles (repr. ed.). Carlton, Victoria: Melbourne University Publishing. ISBN 0-52285-529-6.
- Coulthard-Clark, C. (1998). Where Australians Fought: The Encyclopaedia of Australia's Battles (1st ed.). St Leonards, New South Wales: Allen & Unwin. ISBN 1-86448-611-2.
- Duffy, C. (2007) [2006]. Through German Eyes: The British and the Somme 1916 (Phoenix ed.). London: Weidenfeld & Nicholson. ISBN 978-0-7538-2202-9.
- Ellis, A. D. (1920). The Story of the Fifth Australian Division, being an Authoritative Account of the Division's Doings in Egypt, France and Belgium (PDF) (1st ed.). London: Hodder and Stoughton. OCLC 12016875. Retrieved 13 September 2013.
- Grey, J. (2008). A Military History of Australia (3rd ed.). Port Melbourne, Victoria: Cambridge University Press. ISBN 978-0-521-69791-0.
- James, E. A. (1994) [1924]. Record of the Battles and Engagements of the British Armies in France and Flanders 1914–1918 (Naval & Military Press ed.). London: Gale & Polden. ISBN 1-84342-196-8.
- Jones, H. A. (2002) [1928]. The War in the Air, Being the Story of the Part Played in the Great War by the Royal Air Force (PDF). II (Naval & Military Press ed.). London: Clarendon Press. ISBN 1-84342-413-4. Retrieved 9 August 2014.
- Miles, W. (1992) [1938]. Military Operations France and Belgium, 1916: 2nd July 1916 to the End of the Battles of the Somme. History of the Great War Based on Official Documents by Direction of the Historical Section of the Committee of Imperial Defence. II (Imperial War Museum & Battery Press ed.). London: Macmillan. ISBN 0-901627-76-3.
- Philpott, W. (2009). Bloody Victory: The Sacrifice on the Somme and the Making of the Twentieth Century (1st ed.). London: Little, Brown. ISBN 978-1-4087-0108-9.
- Sheffield, G. (2003). The Somme. London: Cassell. ISBN 0-304-35704-9.
- Sheffield, G. (2011). The Chief: Douglas Haig and the British Army. London: Aurum Press. ISBN 978-1-84513-691-8.
- Williams, J. F. (2005). Corporal Hitler and the Great War 1914–1918: The List Regiment. MPG Books. ISBN 0-415-35855-8.
- Wynne, G. C. (1976) [1939]. If Germany Attacks: The Battle in Depth in the West (Greenwood Press, NY ed.). London: Faber & Faber. ISBN 0-8371-5029-9.
- Newspapers
- Aubrey, S. (5 February 2016). "British Accuse Australia of Banning them from WWI Battle of Fromelles Centenary Commemoration". news.com.au. Archived from the original on 5 February 2016. Retrieved 5 February 2016.
- "Fury as Australia bans British from Fromelles War Memorial". The Australian. Retrieved 5 February 2016. (subscription required (help)).
- Greene, R. A. (20 July 2010). "World War I Dead Laid to Rest 94 Years After Slaughter". CNN News. USA. Retrieved 9 May 2013.
- Totaro, P. (4 May 2009). "Fromelles Site Bans Finders". The Sydney Morning Herald. Sydney: Fairfax. Retrieved 9 May 2013.
- Totaro, P. (17 August 2009). "Fears For Bodies of the Fallen Fromelles Diggers". The Age. Melbourne, Aust. Retrieved 10 May 2013.
- Websites
- Braithwaite, A. (20 July 2010). "Fromelles Diggers Laid to Rest". Australian Geographic. Archived from the original on 5 April 2012. Retrieved 9 May 2013.
- "Fromelles Weppes Terre de Mémoire" (in French). Association pour le Souvenir de la Bataille de Fromelles. 17 February 2002. Retrieved 9 May 2013.
- McMullin, R. (2006). "Disaster at Fromelles". Wartime Magazine. AU. Retrieved 14 April 2007.
- McPhedran, Ian (16 March 2010). "The First 75 of Lost Australian Soldiers at Fromelles Positively Identified". The Daily Telegraph. Sydney: News Limited. Retrieved 9 May 2013.
- "War Grave Detective Receives Honour". WA Today. 7 June 2009. Retrieved 9 May 2013.
Further reading
- Burla, E.; Burla, R. (2005). Crossed Boomerangs: A History of All the Australian 31 Battalions (2nd ed.). Loftus, New South Wales: Australian Military History Publications. ISBN 1-87643-967-X.
- Lindsay, Patrick (2011). Fromelles: Australia's Darkest Day and the Dramatic Discovery of Our Fallen World War One Diggers. Prahran, Victoria: Hardie Grant Books. ISBN 978-1-74066-684-8.
External links
| Wikimedia Commons has media related to Battle of Fromelles. |
- McMullin, R. Disaster at Fromelles
- Fielding, J. VC Corner and Australian Memorial Park, Fromelles
- Fielding, J. Pheasant Wood, Fromelles
- Order of Battle
- Book review: Roger Lee, British Battle Planning in 1916 and the Battle of Fromelles: A Case Study of an Evolving Skill (2015)