Aesepus Bridge
| Aesepus Bridge (Dove Bridge) | |
|---|---|
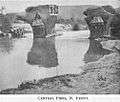
 Central pier (view from south) | |
| Coordinates | 40°16′36″N 27°36′12″E / 40.276667°N 27.603333°ECoordinates: 40°16′36″N 27°36′12″E / 40.276667°N 27.603333°E |
| Carries | Roman road to Kyzikos |
| Crosses | Aesepus (Gönen Çayı) |
| Locale | Ancient Mysia, now Gönen district, Balıkesir Province, Turkey |
| Characteristics | |
| Design | Arch bridge |
| Material | Stone |
| Total length | c. 158 m |
| Width | 5.60 m |
| Longest span | 12.20 m |
| Number of spans | 11 (incl. floodways) |
| History | |
| Construction end | 4th or 5th/6th century AD |
 Aesepus Bridge (Dove Bridge) Location in Turkey | |
The Aesepus Bridge (Turkish: Güvercin Köprüsü, "Dove Bridge") was a late antique Roman bridge over the Aesepus river (today Gönen Çayı) in the ancient region of Mysia in modern-day Turkey. It is notable for its advanced hollow chamber system which has also been employed in other Roman bridges in the region, such as the Makestos Bridge. In a field examination carried out in the early 20th century, the four main vaults of the bridge were found in ruins, while nearly all piers and the seven minor arches had still remained intact. Today, the two remaining pier stubs in the riverbed are still extant, while the condition of the rest of the structure is difficult to determine.[1][2]
Location and dating
The Aesepus Bridge is located in northwestern Turkey, 8 km north of Sariköy as the crow flies, approximately 5.6 km upstream of where the Gönen Çayı flows into the Sea of Marmara, slightly above the point where the narrow river valley opens into the wide estuary plain and a modern bridge carries the highway 200 across the Gönen Çayı.[3] The Aesepus Bridge was part of a Roman road, which in ancient times led across Mysia to the coastal town of Cyzicus, and which, having preserved some of its original Roman paving of 13–15 cm deep small round stones, was in the 19th century still the preferred route for travelling between close-by Bandırma (Panderma) and Boghashehr.[4]
The earliest investigation on the Aesepus Bridge was published by the British archaeologist Hasluck in 1906. Based on structural similarities with other hollow chamber bridges in Mysia like the White Bridge and the Makestos Bridge, as well as Constantine's Bridge, he dates the bridge quartet to the early 4th century AD, in the era of Constantine the Great († 337 AD), when Byzantium was elevated to the capital of the eastern half of the empire.[5]
According to the Italian scholar Galliazzo, though, the characteristic pattern of alternating brick and stone layers in the arch rip (see picture showing the arch of eastern abutment) rather points at an early Byzantine reconstruction from the second half of the 5th or the first of the 6th century AD, during the reign of Justinian. In his view, only the pier foundations and the abutments with their minor arches are unequivocally of Roman origin.[3]
Structure

While all four main arches had collapsed at the time of Hasluck's visit, both ramps and nearly all bridge piers were still standing to full height; only the third pier from the west bank had completely disappeared.[6] The exposed upper part of the piers showed four parallel, slot-like hollow spaces running through the entire length of the structure, which were meant to reduce the load on the vaults.[7] The piers themselves were protected on their up- and downstream side by large cutwaters with pointed caps.[7]

The bridge is 5.60 m wide[4] and around 158 m long.[3] Hasluck gave the spans of the third and seventh opening as 12.20 m each.[8] The facing, including breakwaters and hollow chambers, consists of granite blocks, whereas the interior is filled with mortar-bound rubble.[7] The well-preserved paving of the remaining roadway is made of large, occasionally squared stones, and rests on the roof slabs of the hollow chambers.[4]
Since the Gönen Çayı at the site passes close to the west slope of the valley, the western abutment is comparatively short.[7] Its two arch vaults, only one of which has a semi-circular shape, were built of brick, with the outer voussoirs alternating between groups of stone and brick, as it is also typical of the Makestos Bridge.[7] The 58 m long eastern ramp rests on five arches of diminishing size (the overgrown arch 9 has only been conjecturally reconstructed by Hasluck).[4] At the approach are the remains of an exedra in brick around which the road forks, an alignment also found at the Sangarius Bridge; an 80 cm high cylindrical stone which may have been used for recording repairs stands next to the exedra.[4]
Gallery
-
Central piers (view from north) -

End of eastern abutment -

Arch of eastern abutment
See also
References
- ↑ "Bursa Çanakkale Yolu". Google Inc. Retrieved 8 July 2012.
- ↑ "Aesepus Bridge 2". Microsoft Corporation. Retrieved 8 July 2012.
- 1 2 3 Galliazzo 1995, p. 417
- 1 2 3 4 5 Hasluck 1905–06, p. 187
- ↑ Hasluck 1905–06, p. 189
- ↑ Hasluck 1905–06, p. 184f.
- 1 2 3 4 5 Hasluck 1905–06, p. 185
- ↑ Hasluck 1905–06, pp. 185, 187
Sources
- Galliazzo, Vittorio (1994), I ponti romani. Catalogo generale, Vol. 2, Treviso: Edizioni Canova, p. 417, ISBN 88-85066-66-6
- Hasluck, Frederick William (1905–1906), "A Roman Bridge on the Aesepus", The Annual of the British School at Athens, 12: 184–189, doi:10.1017/s0068245400008066
External links
![]() Media related to Aesepus Bridge at Wikimedia Commons
Media related to Aesepus Bridge at Wikimedia Commons
